
Trust Spicer® lubricant to protect your universal joint and slip assemblies.
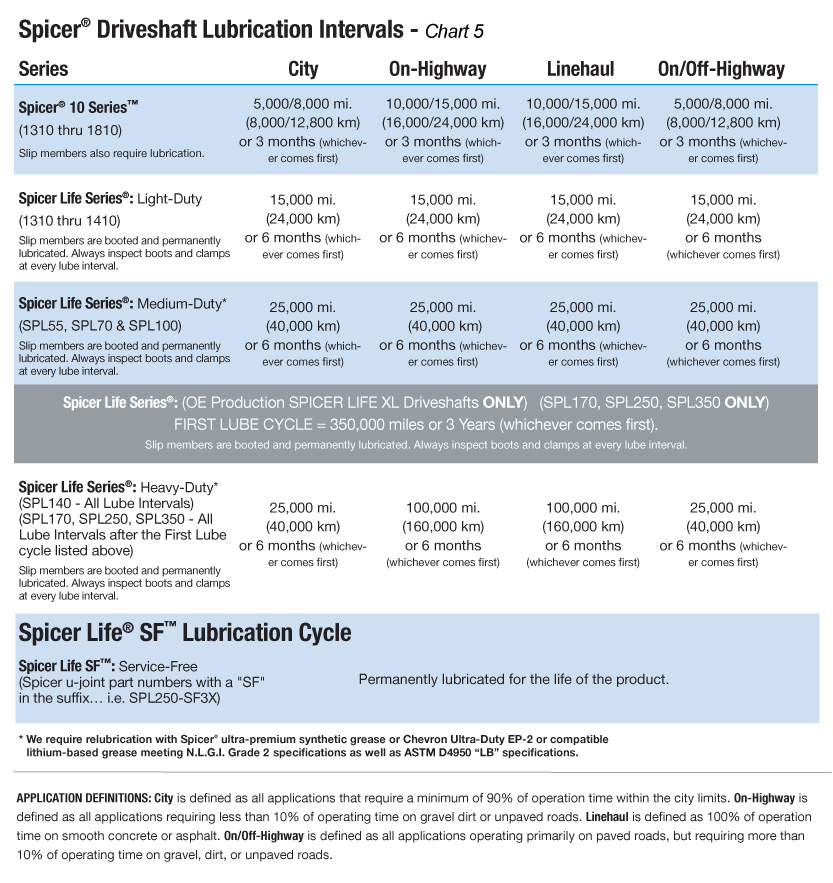
Lack of proper lubrication is the most common cause of premature failure in u-joint kits and slip assemblies. Properly sized Spicer® u-joints that are adequately lubricated at recommended intervals will normally meet or exceed fleet operational requirements. Inadequate lube cycles, and failure to lubricate the u-joints and slip splines properly, will not only cause premature u-joint kit failures, but may lead to other problems, such as slip spline seizures. Relubrication at recommended intervals (see Chart 5) flushes abrasive contaminants from the u-joints and slip components, helping to optimize the life of the driveshaft.
There Is No Substitute for Spicer Products — Including Spicer® Lubrication.
Spicer products are manufactured to original equipment specifications, and Spicer ultra-premium synthetic grease is specifically engineered to complement Spicer® universal joints. You can rely on Spicer products to deliver the premium performance that keeps your vehicle on the road.
Dana recommends lubrication with Spicer ultra-premium synthetic grease or Chevron Ultra-Duty EP-2 or a compatible lithium-based grease meeting N.L.G.I. Grade 2 specifications as well as ASTM D4950 LB specifications. Spicer ultra-premium synthetic grease is compatible with all NLGI-2 greases, and delivers professional-grade quality, even at high temperatures. Spicer ultra-premium synthetic grease is available in 10-packs of 14-oz. tubes (SPL1051), and 1-gal. pails (SPL1052).
Warning: Inadequate lubrication can cause driveline failure, which can result in separation of the driveline from the vehicle. A separated driveline can result in serious injury or death.
In order to minimize the potential for driveline failure, including driveline separation, you must:
- Carefully review the lubrication specifications on this web page and lube manual located here.
- Make sure you use only approved lubricants. We recommend Spicer® ultra-premium synthetic grease.
- Make sure you lubricate at recommended intervals.
U-Joint Kit Lube Procedures
WARNING: To prevent serious eye injury, always wear safety glasses when lubricating or servicing a driveshaft. Failure to wear safety glasses could result in serious injury and/or partial or permanent vision loss.
Spicer® greasable u-joint kits contain only enough grease to provide needle bearing protection during storage. Prior to installing a new u-joint into the driveshaft, you must:
- Remove each bearing assembly and pack each journal cross lube reservoir with grease.
- Wipe a liberal coating of the same grease into the each bearing assembly, filling all of the cavities between the needle rollers.
- Apply a liberal coating of grease into the bottom of each bearing cup.
After installation into a driveshaft, and prior to being placed into service, you must (with the exception of Service-Free U-joints) lubricate each u-joint kit in accordance with the following recommendations:
- Apply grease gun pressure to each u-joint until fresh grease appears at each bearing seal. This purging action not only assures that every bearing has been properly greased, but flushes out any moisture and abrasive contaminants that may have worked their way past the seals.
IMPORTANT: The premium seal design of Spicer u-joints may, on occasion, prevent one or more bearings from purging. If that should ever happen, try one of these purging procedures to relieve seal tension: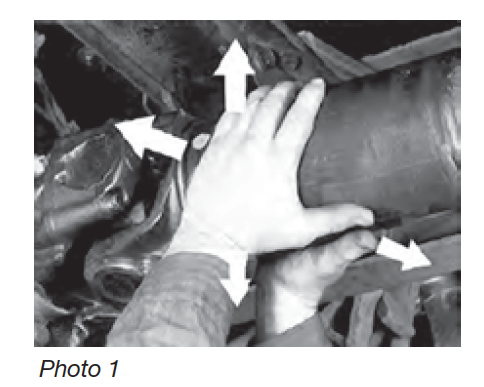
1. Push up on the driveshaft, from the side opposite the bearing that will not purge, while applying gun pressure to the lube fitting. This might create a slightly greater clearance around the bearing’s sealing surface and may allow the bearing to purge (see Photo 1).
2. Using a brass hammer and wearing safety glasses, sharply strike lug ear of the inboard yoke once to firmly seat the bearing against the retainer 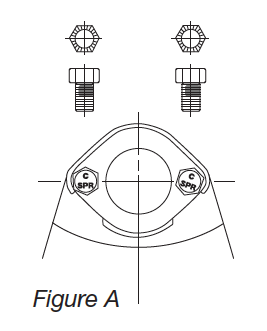 (retainer may be a snap ring,bearing plate or spring tab). Striking the yoke ear may relieve tension across the span. Rotate shaft 180 degrees and repeat procedure on opposite lug ear. Apply grease gun pressure. If the problem still persists move on to steps 3 and 4.
3. Depending on the type of yoke design in your driveshaft, release pressure on the affected bearing(s) as follows:
- On full round Spicer 10® Series closed hole yokes with self-locking bolts and bearing plates: (see Figures A and B)
 Release seal pressure by loosening the bolts that retain the non- purging bearing cap(s) in the yoke ear(s). Apply grease gun pressure to purge the bearing or bearings.
- If loosening the bolts does not allow purging, remove the bearing(s) to determine the cause of blockage. (Refer to Bolt Installation Procedures section covering the re-installation of any loosened or removed, bolts.)
- On full round Spicer Life Series® or SPL® closed hole style yokes with inboard bearings that are retained by spring tabs, you should never loosen the spring tabs to release seal pressure on the bearing seals (see Figure C).
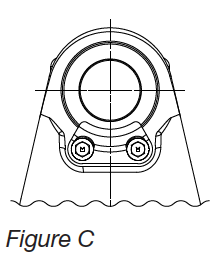 SPL® u-joint kits with bearings that will not purge must be removed and replaced with a new kit.
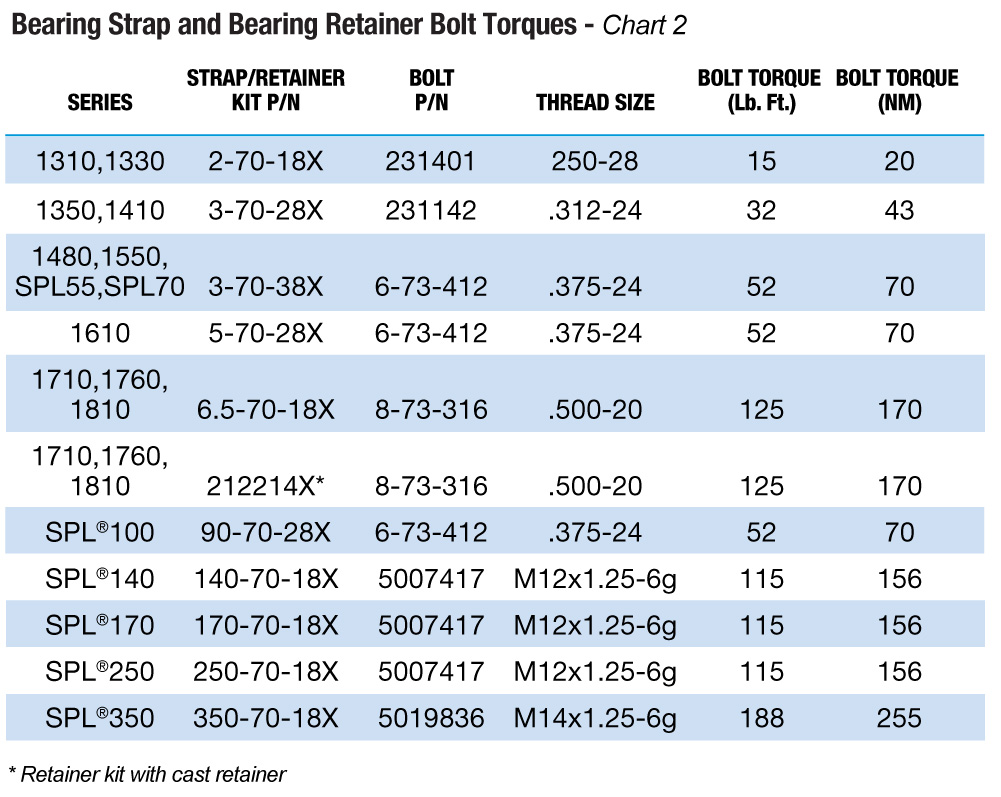
- Refer to the chart below for bolt torque for spring tab bolts.

NOTE: If you must remove the u-joint kit from the driveshaft yoke and replace it with a new kit, refer to SPL® Service Manual No. DSSM 0100 for u-joint kit installation instructions. Click here to view.
- For light-duty Spicer 10® series and SPL350 series using full round yokes with snap rings on the inboard bearings, the u-joint kit must be removed form the driveshaft and replaced. Releasing seal pressure cannot be done safely without removal of the u-joint kit.
CAUTION: ALWAYS replace any loosened or removed bolt with a NEW BOLT. Refer to Bolt Installation Procedures section for instructions.
4. On half round type yokes with bearing retainers or bearing straps:
- Release pressure by removing the retainer or strap and unhooking the end of the driveshaft from the yoke ears.
CAUTION: Driveshafts are extremely heavy. Always use a restraining strap to prevent them from falling out of the vehicle.
- With the driveshaft hanging on the restraining strap, install a C clamp around the non-purging bearings and apply grease gun pressure until they purge. Loosen the C clamp as necessary to force purging. If the bearing(s) still fail to purge, remove the u-joint kit from the driveshaft and replace it.
IMPORTANT: Vehicles in service MUST be re-lubed at specific intervals. Refer to the lube interval chart on the back of this brochure for recommendations regarding lube cycles vs. specific applications.
New Spicer Service-Free (SF) light-duty and medium-duty u-joints are shipped pre-lubed, with the bearings installed on the cross trunnions. It is not necessary to grease them after installation.
Spicer Life Series® (also referred to as SPL®) heavy-duty service-free u-joint kits (SPL170, SPL250 & SPL350 series part numbers with a SF suffix - i.e. SPL250-SF3X) are supplied with a pre-determined amount of Spicer synthetic grease,which must be added to the journal cross and bearing caps prior to assembly into the driveshaft yokes.
PROCEDURE: Fill each journal cross with grease. Wipe the remaining grease into each bearing cap, filling the cavities between the needle bearings. Wipe a liberal amount of grease on the bottom of each bearing.
CAUTION: When you remove the SF bearings from the cross trunnions, some grease may be sucked out of the cross reservoir. ALWAYS make sure you re-install the same bearing back onto the same cross trunnion when installing the u-joint into the driveshaft yoke.
Bolt Installation Procedures
(Refer to Charts 1, 2, 3, and 4 for kit numbers, bolt part numbers and recommended torques.)
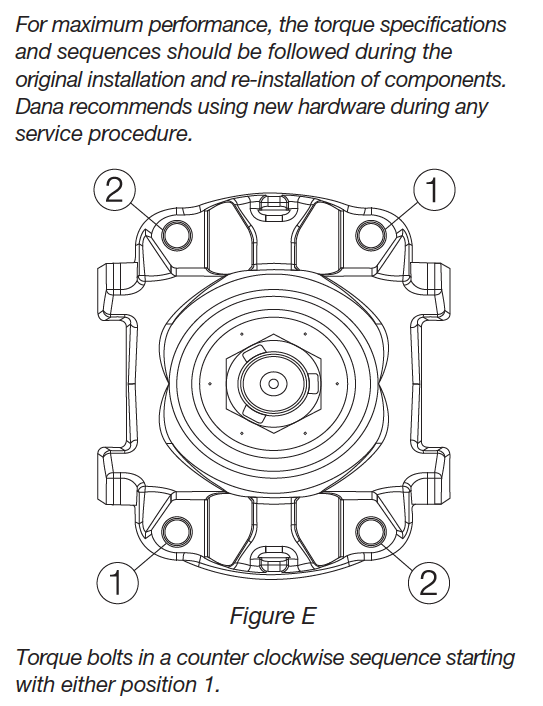
CAUTION: If you have removed or loosened any bearing cap fasteners, ALWAYS replace them with new and torque them to the recommended torque shown on the Charts 2, 3, and 4. If your 10 Series retention method was a stamped bearing strap, ALWAYS replace the used bearing strap with a new bearing strap. (NOTE: Bearing retainers used with Spicer Life Series® or SPL® driveshafts can be reused if they are not damaged. Refer to Chart 2 and Figure E for recommendations on the proper tightening sequence for bearing strap and retainer bolts.)
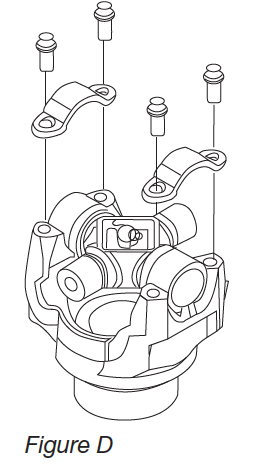
 Spicer 10® Series and SPL® driveshafts are usually retained in the vehicle with either bearing strap kits or bearing retainer kits that utilize self-locking bolts, which have a lock patch. (see Figure D to the left and Chart 2 above)
On some Spicer 10® Series u-joint kits,
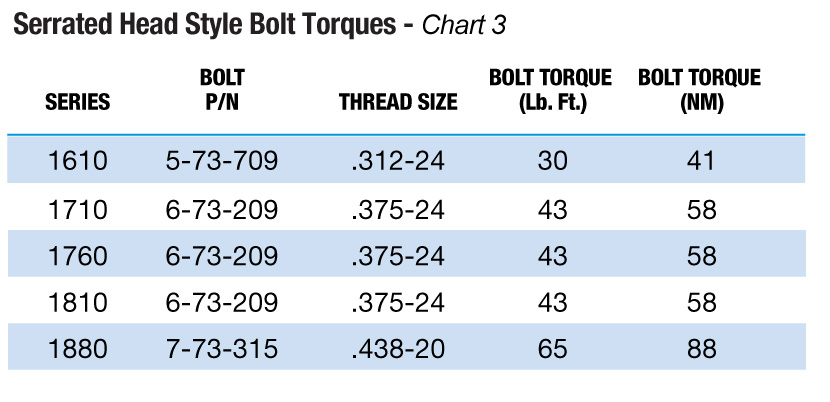
the bearing assemblies use a bearing plate welded to the bearing assembly and bolted to the yoke ear with self- locking bolts that have a serrated head and a lock patch (see Figure A). Serrated head and lock patch installation procedure: Loosely install the NEW bolts, and then tighten them to the torque shown in Chart 3 below. (see Warning below)
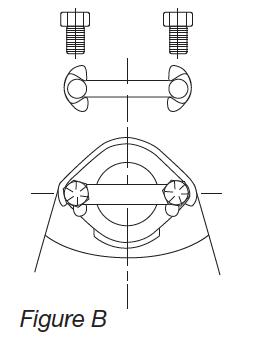
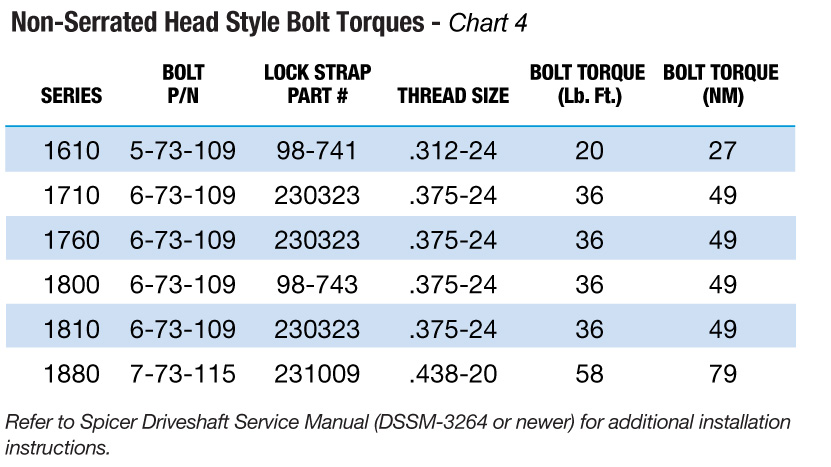
Some are retained with self-locking bolts that have a non-serrated head and lock patch and use a lock strap. (see Figure B) Non-Serrated head with lock patch and lock strap installation procedure: Loosely install the NEW bolts, and then tighten them to the torque shown in Chart 4. After tightening to the proper torque, bend the tabs of the lock straps up against the bolt heads to lock the bolts in place. (see Warning below)
Warning: Failure to replace self-locking and/or serrated head bolts and/or failure to properly torque any retaining bolt, or failure to properly bend the lock tabs on lock strap-style installations could cause the driveshaft to loosen and separate from the vehicle or machine, which could cause loss of control and result in personal injury or death.
Spicer 10® Series Slip Assemblies Lubrication Procedure
 Re-lube slip assemblies at the same intervals, and with the same lube, as u-joint kits.
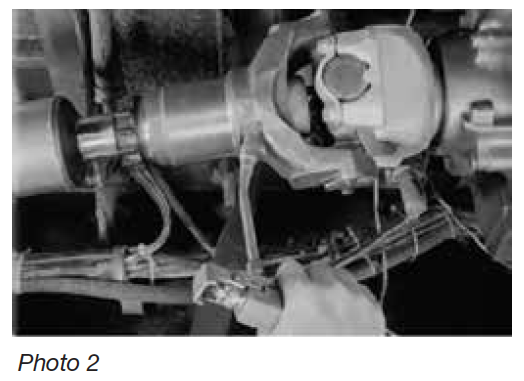
- Apply grease gun pressure until fresh grease appears at the pressure relief hole in the slip yoke plug. (see Photo 2)
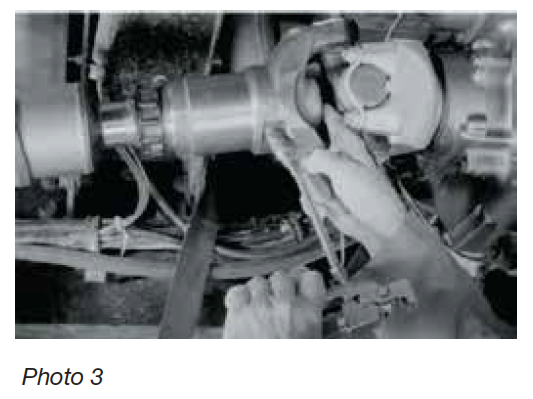
- Cover the hole in the plug with your finger and continue applying grease gun pressure until fresh grease appears at the slip yoke seal. (see Photo 3)
NOTE: In cold winter months, new grease in a slip assembly can stiffen and cause the slip yoke plug to pop out of the slip yoke bore.
- Activate the slip spline by driving the vehicle enough to displace a little grease out of the pressure relief hole.
- Failure to complete this recommendation can lead to premature failure of the slip assembly if the slip yoke plug is lost.
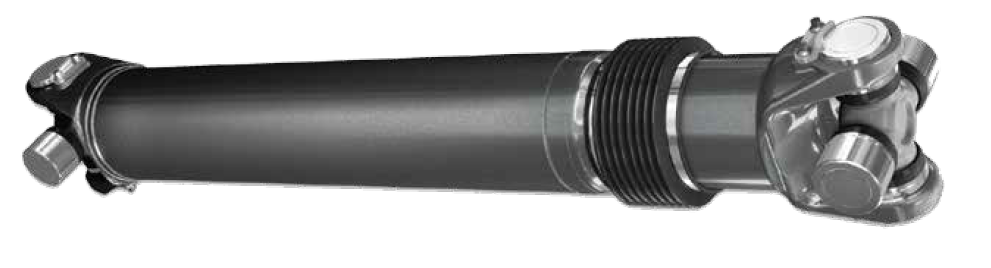
SPL® Slip Assemblies (with boots) Lubrication Procedure
- SPL® slip assemblies are lubed for life and do not require additional lube.
- Any damage to the boot, or any loss or damage to any of the boot clamps, will require the replacement of the entire boot kit assembly. Refer to SPL® service manual DSSM 0100 for instructions on cleaning and re-greasing the slip assembly and installation of the new boot.
- SPL® boot kits come with a sealed package of grease containing the 4 ounces of Chevron Ultra-Duty EP-2 lubricant. No additional grease needs to be added.
Center Bearing Assembly Lubrication Procedure
- Lubrication of the bearing itself takes place during its manufacturing process and no attempt should be made to add or change the grease within the bearing itself.
Spicer® XC™ Center Bearing Lubrication Procedure
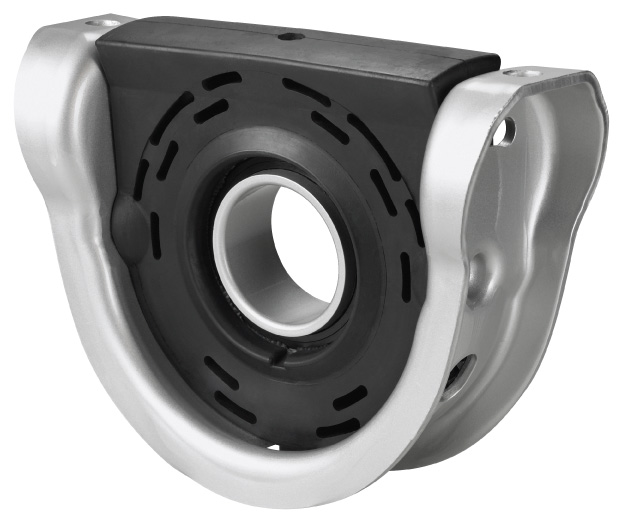 Driveshafts with Spicer® XCTM center bearing assemblies do not require any lubrication within the bearing or to the bearing outer surface due to the maintenance-free double lip seal within the bearing itself. Please refer to bulletin JOI-TEC-56 for installation procedures which can be found in the Spicer Literature Library.

To learn more about universal joint lubrication procedures, check out these videos demonstrating the universal joint lubrication path for a Spicer u-joints.
And for more information about genuine Spicer universal joints, talk to your Spicer parts representative today.